Joining tubes
It did not rain tomorrow. Nevertheless I spent the whole of it welding. And since the object of this exercise is not so much a long wheelbase bike - that is a mere byproduct - but the recycling of old frames, we were into High Satisfaction Mode.
First to the seat supports. Bending tube, we have established, is not easy. So I look for bits that are already bent. Here's a suitable frame: a child's Huffy, where the chainstays are 3/4" 18 gauge.
 Unfortunately I had only the one Huffy, so the support for the seat base can be the top bits of a perfectly good gentleman's mountain bicycle front fork. Here it is with the bottom of the fork legs snipped off, and the steering tube also snipped off.
 The way you join tube, canonised by the BHPC about thirty years ago, is to insert a short stub and weld it in place through holes, a technique known as plug-welding. I've found with my MIG set-up that any hole smaller than 4mm tends to fail. The hole fills up before the substrate metal gets a chance to weld.
 First I weld the stub in one end, then hammer the other end onto the stub. (With a big hammer. Whack whack whack, Mr. Knight. Precision engineering.)
 Then the plug-holes are welded up, and the ends of the two tubes welded together.
Next, to an examination of all available frames. One I particularly treasured was an Australian frame bearing the auspicious name Ricardo. Unf. I couldn't get the seat post out. I had long ago tied a bit of inner tube over the end of the tube and poured Drano into it to dissolve the seat post, but it had only partly worked, and the BB shell was now full of rust, so feeling brutal I sawed it up. Nice thin-gauge Tange tubing, too. It occurred to me that a bit of heat might free up the seat-post, and the blowtorch provided this heat and the Drano started to bubble, so I took it outside to tip it away and found that it solidified as it fell out of the tube. It wasn't bubbling Drano at all. It was molten aluminium. And returning to the workshop there was smoke everywhere and I discovered that the molten metal was sitting in little blobs all over the place incl. the bit of carpet I keep there and incl. ten feet away next to the lathe. How I managed not to spill it on my feet is a mystery. I'm normally pretty good at hurting myself with easily preventable mishaps. Last week I hacksawed the back of my hand. Difficult trick to accomplish, but I managed it.

An application of angle-grinder revealed that whoever brazed the Ricardo together hadn't done much cleaning of the joints. Several of the lugs had brass at the edges but no brass inside the joint. Just rust.

Nice guarantee, though. Amazing what rubbishy joints manage still to work perfectly well for the lifetime of the bike.

Did I forget to illustrate my fantastic method of mitering the crossbar to incorporate the steering pivot? Here it is. Slits in the tube end, pliers to bend it to shape, lots of bits of angle-iron and box section and clamps and rubber strips to hold everything in line, and then weld on top of the bent bits of metal to conceal everything from the critical gaze and caustic remarks of Mr. Knight.

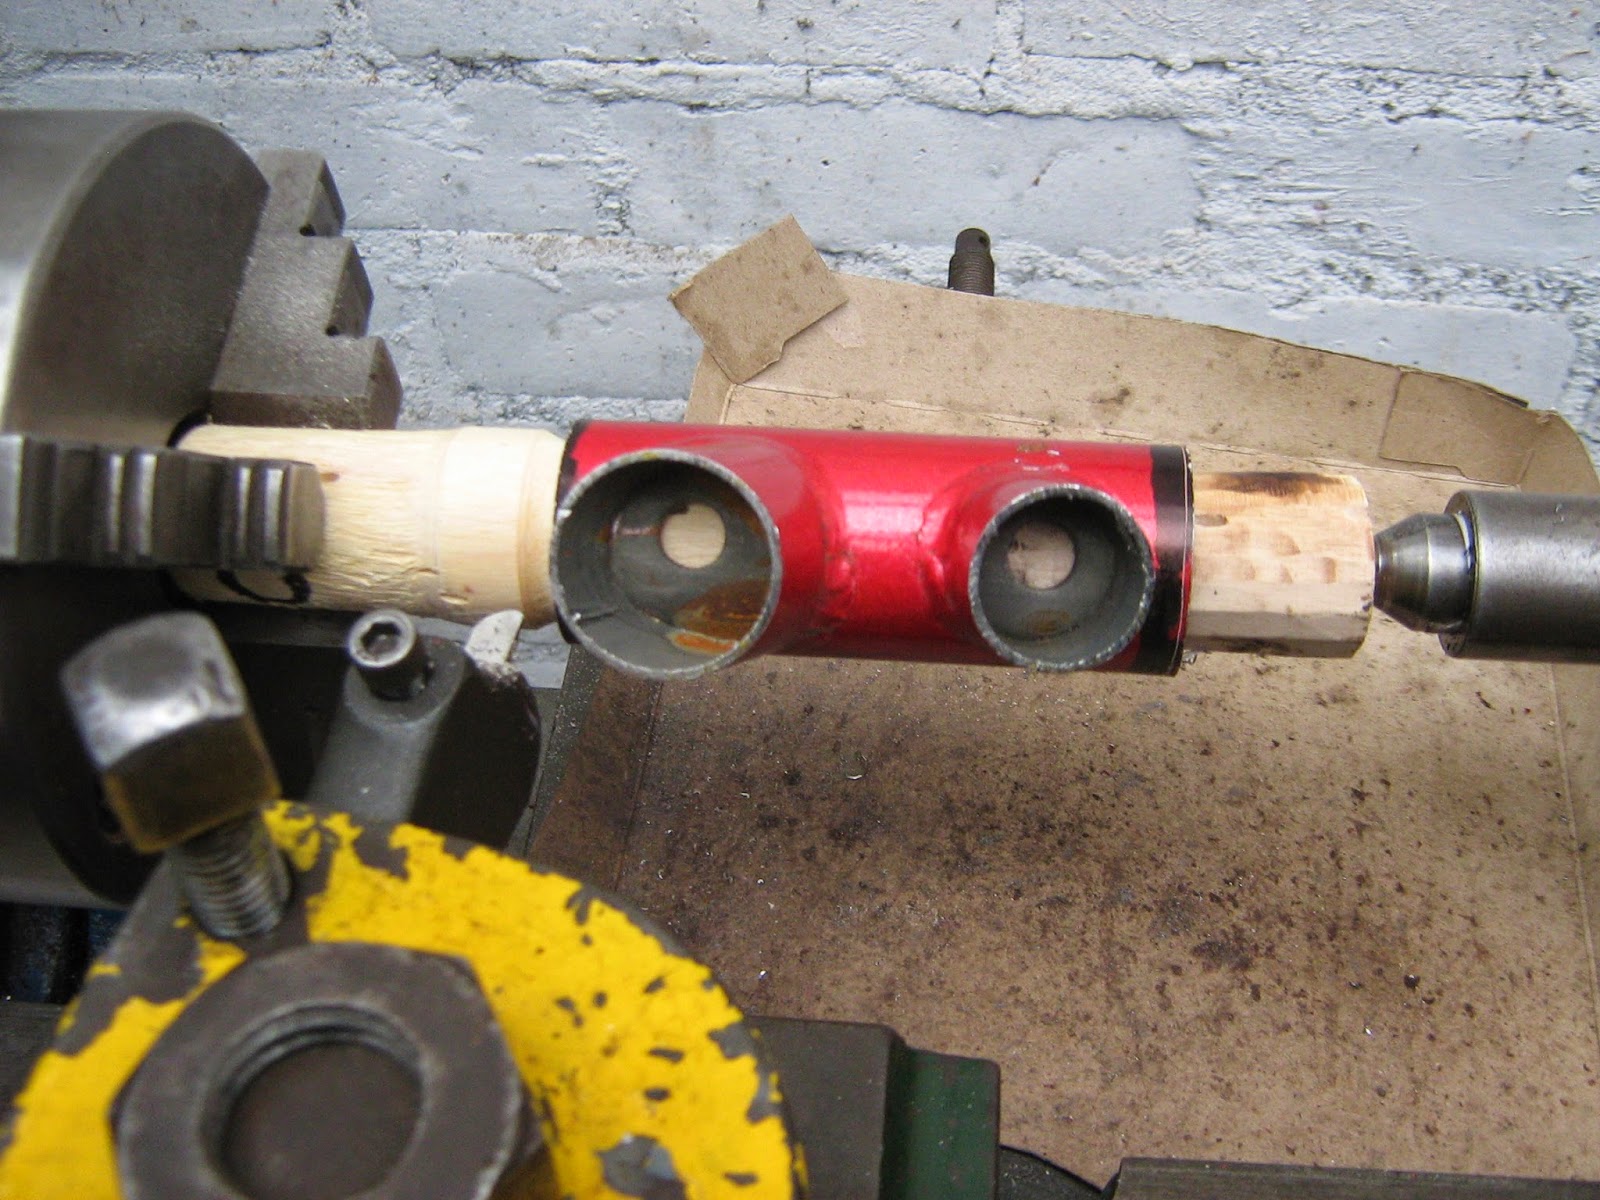
To the steering head. My first donor 20" fork turned out to have a horribly bent steering tube, and the second one seemed to have a weird sized head bearing set which was no longer present, so I had to find another fork, for which I had no head tube. However friend Huffy yielded a head tube, albeit too long. The head tube needs to be 1 1/2" shorter than the fork's steering tube. The only way I could machine the shortened ends square to the bore was on an arbor, turned for the job out of a stick of firewood.
Then off with all the paint (fire, wire brush) and more tube surgery to improvise lugs.

 Then remember to put the BB onto the crossbar before welding the frame together.
 Lugless joints + MIG welder + me as the operative = worry. So I gusset all the joints, which is nearly as good as a lug, and better because then Mr. Knight can't see the welds.

The gusset is only ever welded at the sides of the tubes according to Mr. Foale's book, never at the ends of the gussets. Otherwise the tube itself is weakened, and at its weakest point, too. Besides, welding along the sides of a tube is very easy.
 First I tack-weld the gusset in place, and then hit it with a hammer until it fits. This delicate process is known as cold-forming.
 Finally the sides of the gusset are welded in place. And here's the finished frame, with end-welded Ricardo downtube:

Next we have to shorten a steering tube for the intermediate handlebar. Same process as before, with the added dignity of squaring the ends on the lathe so that the bearings eventually run parallel to one another. This isn't strictly necessary in a low-stress pivot, but it's readily achievable. Then snip off a handlebar clamp from somewhere and weld it in place.

Finally start to think about the rod that will connect handlebar to front fork. The Ricardo frame provided some beautifully light seat stays: they will do, welded end-to-end. Interesting to see that there was so little brass on the bridge that - well, in fact, one bit had no brass at all, just rust. Very reassuring, that. The bike had been well-ridden when I came by it, and if a hard-ridden bike survives with negligible jointing, then my gussets ought to hold.

First to the seat supports. Bending tube, we have established, is not easy. So I look for bits that are already bent. Here's a suitable frame: a child's Huffy, where the chainstays are 3/4" 18 gauge.
Next, to an examination of all available frames. One I particularly treasured was an Australian frame bearing the auspicious name Ricardo. Unf. I couldn't get the seat post out. I had long ago tied a bit of inner tube over the end of the tube and poured Drano into it to dissolve the seat post, but it had only partly worked, and the BB shell was now full of rust, so feeling brutal I sawed it up. Nice thin-gauge Tange tubing, too. It occurred to me that a bit of heat might free up the seat-post, and the blowtorch provided this heat and the Drano started to bubble, so I took it outside to tip it away and found that it solidified as it fell out of the tube. It wasn't bubbling Drano at all. It was molten aluminium. And returning to the workshop there was smoke everywhere and I discovered that the molten metal was sitting in little blobs all over the place incl. the bit of carpet I keep there and incl. ten feet away next to the lathe. How I managed not to spill it on my feet is a mystery. I'm normally pretty good at hurting myself with easily preventable mishaps. Last week I hacksawed the back of my hand. Difficult trick to accomplish, but I managed it.
An application of angle-grinder revealed that whoever brazed the Ricardo together hadn't done much cleaning of the joints. Several of the lugs had brass at the edges but no brass inside the joint. Just rust.
Nice guarantee, though. Amazing what rubbishy joints manage still to work perfectly well for the lifetime of the bike.
Did I forget to illustrate my fantastic method of mitering the crossbar to incorporate the steering pivot? Here it is. Slits in the tube end, pliers to bend it to shape, lots of bits of angle-iron and box section and clamps and rubber strips to hold everything in line, and then weld on top of the bent bits of metal to conceal everything from the critical gaze and caustic remarks of Mr. Knight.
To the steering head. My first donor 20" fork turned out to have a horribly bent steering tube, and the second one seemed to have a weird sized head bearing set which was no longer present, so I had to find another fork, for which I had no head tube. However friend Huffy yielded a head tube, albeit too long. The head tube needs to be 1 1/2" shorter than the fork's steering tube. The only way I could machine the shortened ends square to the bore was on an arbor, turned for the job out of a stick of firewood.
Then off with all the paint (fire, wire brush) and more tube surgery to improvise lugs.
The gusset is only ever welded at the sides of the tubes according to Mr. Foale's book, never at the ends of the gussets. Otherwise the tube itself is weakened, and at its weakest point, too. Besides, welding along the sides of a tube is very easy.
Next we have to shorten a steering tube for the intermediate handlebar. Same process as before, with the added dignity of squaring the ends on the lathe so that the bearings eventually run parallel to one another. This isn't strictly necessary in a low-stress pivot, but it's readily achievable. Then snip off a handlebar clamp from somewhere and weld it in place.
Finally start to think about the rod that will connect handlebar to front fork. The Ricardo frame provided some beautifully light seat stays: they will do, welded end-to-end. Interesting to see that there was so little brass on the bridge that - well, in fact, one bit had no brass at all, just rust. Very reassuring, that. The bike had been well-ridden when I came by it, and if a hard-ridden bike survives with negligible jointing, then my gussets ought to hold.
And now, alas, I have caught a cold, and need being felt sorry for.
Labels: joining tubes, long wheelbase bike, longevity of badly brazed bike, plug-welding, recycling old bikes
posted by richard middleton at
2:25 AM
![]()

0 Comments:
Post a Comment
Subscribe to Post Comments [Atom]
<< Home